Honey Baked Ham

– 10-12 lb uncooked shank portion ham
– 3 Tbsp dijon mustard
– 1 c brown sugar
– 1/2 c honey
– 1 tsp cinnamon
1.   Trim fat and score in a diamond pattern. This looks nice but also allows the fat to render while cooking. Bake at 325 for 20 minutes per pound until internal temperature is 160.

2.   Meanwhile mix mustard, brown sugar, honey and cinnamon together.

3.   During the last 45 minutes of cooking spread glaze over ham.

4.   Slice into thin slices.

Courtesy: Just A Pinch

Herbes de Provence Leg of Lamb

The simple stuffing in this recipe combines shallots and garlic with a mixture of herbs that you can vary according to what is in your garden or fresh at the market, such as thyme, oregano, tarragon or marjoram. You can ask the butcher to butterfly the boned lamb for you and pound it to an even thickness.

  • 1 boneless leg of lamb, about 4 lb.
  • 4 shallots, chopped
  • 4 garlic cloves, minced
  • 1/4 cup chopped fresh flat-leaf parsley
  • 1/4 cup chopped fresh mint
  • 2 tsp. herbes de Provence
  • 1/2 tsp. salt, plus more, to taste
  • 1/2 tsp. freshly ground pepper, plus more, to taste
  • 3 Tbs. olive oil
  • 1 yellow onion, sliced
  • 1 parsnip, peeled and sliced
  • 1 cup dry white wine
  • 2 cups chicken stock
  • 1 Tbs. chicken demi-glace

Using a sharp knife, trim away most of the fat from the surface of the lamb. Lay the lamb flat, with the bone side up, on a cutting board and trim away any large pockets of fat. Cut several shallow slashes through the thicker muscles to make the lamb a more even thickness. Using a meat mallet, pound the lamb to an even thickness of 1 to 1 1/4 inches.

In a small bowl, stir together the shallots, half of the garlic, the parsley, mint, 1 tsp. of the herbes de Provence, the 1/2 tsp. salt and the 1/2 tsp. pepper. Rub the cut side of the lamb with 1 Tbs. of the olive oil and spread the herb mixture almost to the edges of the lamb. Starting from the short side, roll up the lamb tightly around the stuffing, forming a cylinder. Securely tie the roll at 2-inch intervals with kitchen twine. Season the lamb all over with the remaining 1 tsp. herbes de Provence, salt and pepper.

In the stovetop-safe insert of a slow cooker or in a large sauté pan over medium-high heat, warm the remaining 2 Tbs. olive oil. Add the lamb and brown on all sides, 12 to 15 minutes total. Transfer to a plate.

Add the onion and parsnip to the insert or pan, reduce the heat to medium and cook, stirring occasionally, until the vegetables are softened, about 5 minutes. Add the remaining garlic and cook until fragrant, about 1 minute. Add the wine and cook, stirring to scrape up the browned bits from the pan bottom. Bring to a boil and cook until the wine is reduced by half, 3 to 5 minutes. Stir in the stock and demi-glace and bring to a simmer.
If using a slow-cooker insert, return the lamb and any accumulated juices to the insert and transfer to the slow-cooker base. If using a sauté pan, transfer the vegetables and liquid to a slow cooker and add the lamb and juices. Cover and cook on high according to the manufacturer’s instructions until the lamb is very tender, 4 to 5 hours. Transfer the lamb to a carving board, cover loosely with aluminum foil and let rest for 10 minutes.
Using a large, shallow spoon or ladle, skim off the fat from the cooking liquid. Adjust the seasonings with salt and pepper. Transfer to a warmed sauceboat.
Remove the strings from the lamb. Cut the lamb crosswise into slices and arrange on a warmed platter. Serve immediately and pass the sauce alongside. Serves 6 to 8.

Adapted from Williams-Sonoma Essentials of Slow Cooking, for The Blender

Savory Herb Braised Brisket

Servings: 6-8
Kosher Key: Meat, Kosher for Passover
Total Time: 5 Hours

Ingredients

  • 5-7 lb brisket
  • Extra virgin olive oil
  • 4 onions, diced
  • 5 carrots, carrots, peeled & sliced into 1-inch pieces
  • 5 celery stalks, peeled and sliced into 1-inch pieces
  • 10 sprigs thyme
  • 2 sprigs rosemary
  • 2 bay leaves
  • 8 cloves garlic
  • 1 qt beef broth
  • Kosher salt
  • Black pepper
  • Potato starch (optional)
  • Fresh chopped parsley (optional, for garnish)

You will also need

  • Large heavy roasting pan (not aluminum or disposable)
  • aluminum foil
GF Note: If you’re cooking gluten free, make sure that your beef broth and potato starch are certified GF.
Preheat oven to 300 degrees F. Rinse the brisket and pat dry. Rub both sides of the meat with black pepper and kosher salt.
Heat roasting pan over a medium flame on the stovetop. Drizzle a few tablespoons of olive oil into the pan. Brown the brisket on both sides—it will take about 4 minutes per side.
Remove brisket from the pan. Drizzle a little more olive oil in the pan and add the diced onions, carrot slices and celery chunks. Sauté the vegetables for a few minutes, scraping up the brown bits on the bottom of the pan with your spatula.
When onion is translucent and carrot slices are slightly caramelized, scoop them out of the pan and place in a bowl. Pour beef broth into the bottom of your pan till covered. Scrape up any remaining brown bits on the bottom of the pan as the broth heats up.
When broth is hot, add half your vegetables back into the pan spread out across the bottom. Place your brisket back into the pan, fatty side facing up. Place garlic cloves on top of the meat, evenly spaced. Add the remaining veggies to the pan, spreading them on top of the brisket to cover. Place herbs on top of the brisket and in the broth, evenly dispersed.
Pour more beef broth into the pan until it goes halfway up the sides of your brisket. Cover roasting pan tightly with foil and place in the oven.
Let it roast undisturbed for 5 to 7 hours. It will take about 1 hour per pound of meat (leaner cuts of meat may take longer—test for doneness). Brisket is ready when it flakes tenderly. You can let it cook even longer for a soft, shredded texture (my favorite!).
Remove brisket from the pan and let it rest on the cutting board for 20-30 minutes before slicing.
Strain pan drippings from the roasting pan into a saucepan and allow to cool.
Skim fat from the surface of the pan drippings…
then reheat the remaining liquid till hot (not boiling). Thicken with a slurry of potato starch to make gravy, if desired.
Cut fat cap off the brisket…
then cut the brisket in thin slices against the grain.
Serve topped with pan juices or thickened gravy.
Garnish with fresh chopped parsley, if desired.
This recipe is courtesy The Shiksa in the Kitchen

Potato Crusted Roasted Vegetable Pot Pie

Servings: 8
Kosher Key: Pareve
Total Time: 2 Hours 45 Minutes

Potato Crust Ingredients

  • 3 1/2 cups peeled, finely shredded Russet potatoes (about 2 1/4 lbs. potatoes)
  • 1/2 cup olive oil
  • 1 1/4 tsp sea salt
  • 3 tbsp finely chopped fresh marjoram
  • 1 tbsp finely chopped fresh rosemary
  • 2 tsp dry thyme
  • 1 large egg, lightly beaten
  • Freshly ground black pepper

Filling Ingredients

  • 2 cups carrots, peeled and cut into 1/2 inch rounds
  • 2 cups shallots, peeled and cut into 1 inch pieces
  • 2 cups sweet potato, peeled and cut into 1/2 inch pieces
  • 1/4 cup + 1 tbsp olive oil
  • 2 cups zucchini, cut into 1/2 inch rounds, then halved
  • 2 tsp finely minced garlic
  • 2 tbsp finely chopped fresh thyme
  • 1/3 cup red wine
  • 1/3 cup vegetable stock
  • Sea salt and freshly ground black pepper

You will also need

  • large wire mesh strainer, plastic wrap, 10 inch pie plate, 9 x 13 x 3 inch baking or roasting pan

Preheat the oven to 425 degrees F. To make the potato crust: Use a food processor fitted with the fine grater attachment — or a handheld fine grater — to grate the potatoes. (The former is much easier!) After the potatoes are grated, add them to a large strainer held over a large bowl. Then use your hands to squeeze as much liquid as possible out of the potatoes. Potatoes have a very high water content, so you’ll be surprised at the quantity of liquid; you can actually “wring out” the potatoes!

Add the potatoes to a large mixing bowl with the olive oil, salt, marjoram, rosemary, thyme, egg, and a few turns of pepper. Mix until everything is evenly incorporated. Remove about 1 1/4 cup of this mixture and set it aside in the refrigerator, covered tightly with plastic wrap, pressed down directly on the potatoes — this will be the top crust of the pie.
Gently press the remaining potato mixture into a 10 inch pie plate, covering the bottom and sides evenly.
If it seems any excess moisture has collected, use a paper towel to press down gently on the top surface.
Place the filled pie plate in the preheated oven for about 20 minutes — the edges should be beginning to brown. Now reduce the heat to 350 degrees F and continue cooking for about another 10 minutes, until the bottom is only slightly golden brown or dry.
Remove the crust from the oven and turn the heat up to 475 degrees F.
To make the filling: add the carrots, shallots and sweet potato to a 9 x 13 x 3 inch baking or roasting pan. Toss them with 1/4 cup of the olive oil and sprinkle with salt and pepper. Place this in the preheated oven and roast until all of the vegetables are tender and nicely browned, about 45 minutes. Stir the vegetables every 15 minutes or so. (The sweet potato will become mushy — and that’s what we want, as it will cause the filling of the pie to thicken!)
Add the zucchini, garlic and thyme to the roasting pan and mix to combine. Then return the pan to the oven for another 15 minutes, to soften the zucchini. Reduce the oven heat to 400 degrees F.
Pour the wine and vegetable stock over the roasted vegetables. Use a wooden deglazing spatula to incorporate the liquid into the vegetables and to scrape off any caramelized bits that are stuck to the bottom of the pan. (These bits are part of what make this so delicious!)
Season with salt and pepper to taste and carefully pour the mixture into the prepared potato crust.
Remove the reserved potato mixture from the refrigerator, and if necessary, squeeze it again with your hands to remove any excess liquid. Then evenly distribute it across the top of the pie. Drizzle with the remaining 1 tbsp of olive oil and sprinkle with a bit of salt and pepper. Try to seal the potatoes on the top of the pie with the precooked edges along the top rim. Don’t worry if the there are areas where the vegetables show through.
Place the pie in the oven and bake until the top crust becomes golden brown, about 20 minutes. If it hasn’t become brown and crisp, place it under the broiler for about a minute.
Let the pie rest for at least 45 minutes before serving.
This recipe courtesy The Shiksa in the Kitchen

Green Bean Tomato Sauté

Ingredients

  • 2 lbs green beans, trimmed
  • 1/3 cup olive oil
  • 1 sweet onion (Mayan or Vidalia), peeled and diced
  • 2 cloves garlic, minced
  • 1 lb ripe tomatoes, seeded and chopped or 1 can (14 oz) diced tomatoes
  • 3 tbsp tomato paste
  • 2 tsp fresh minced oregano (or 1 tsp dried oregano)
  • 1 tsp sugar
  • Salt and pepper
Chop the green beans into 1 1/2 – 2 inch pieces.
Heat the oil in a wide sauté pan over medium. Sauté the diced onions for 5 minutes till softened. Add the minced garlic and continue to sauté for another 2 minutes till fragrant.
Add the green beans to the pan and sauté for 5 minutes, stirring occasionally, till the green beans warm up and begin to lighten slightly in color.
Add the tomatoes, tomato paste, and oregano to the pan. Stir till all ingredients are blended.
Add hot water to the pan till the green beans are about 80% covered. Add sugar to the pan, and season with salt and pepper to taste. I usually add about 1 1/4 tsp of salt and 1/2 tsp of pepper.
Stir all ingredients and bring to a slow boil for 2 minutes.
Cover the pan and reduce heat to low. Let the green beans cook for 20-50 minutes, depending on how soft you like the green beans. 20 minutes will produce a tender-crisp “al dente” texture; 50 minutes will make them very soft. I like to cook them for about 30 minutes, so they’re tender but not mushy.
Serve the green beans warm as a side dish, or at room temperature (which can be nice during the summer months). The tomato sauce is perfect for dipping fresh bread.
It’s the kind of dish that improves with time, so if you want to cook the green beans a day ahead and let them marinate overnight in the fridge, they will taste even better the next day!
This recipe courtesy The Shiksa in the Kitchen

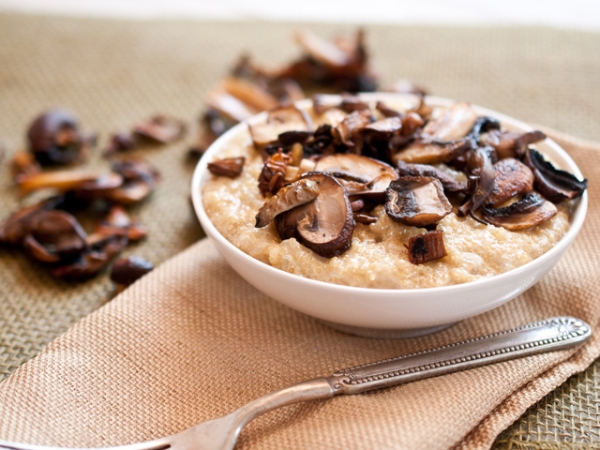
Roasted Mushroom Quinoa Risotto

Servings: 4
Kosher Key: Dairy

Ingredients

  • 2 cups assorted chopped mushrooms (such as shiitake, crimini, oyster)
  • 1 tbsp olive oil
  • 2 cups vegetable broth
  • 3 tbsp unsalted butter
  • 1 tbsp chopped shallots
  • 3 cloves garlic, minced
  • 1 cup quinoa, rinsed and dried
  • 1/4 cup dry white wine
  • 1/4 cup grated Parmesan cheese
  • 1/4 cup heavy cream
  • Salt and pepper
Preheat oven to 400 degrees. Place mushrooms on a baking sheet and drizzle with olive oil, toss to coat.
Roast in the oven until the mushrooms have turned dark and are cooked through, about 10-15 minutes.
Place the vegetable broth in a saucepan and bring to a mild simmer, keeping to warm, but not boiling.
In a separate pot, toast the dry quinoa, stirring constantly, until you can smell a nutty aroma, about 3 minutes.
Remove quinoa from the pot, then add the butter and allow to melt over medium heat. Add the shallots and cook until opaque, but don’t allow to brown. Add the garlic and cook until you can smell it, about 20 seconds. Stir in the quinoa, cooking until it is completely coated with butter. Don’t allow to brown. About 2 minutes.
Add the wine and cook until the pan begins to dry, stirring frequently. About 4 minutes.
Add a ladle full (about 2/3 cups) of broth into the quinoa. Stir frequently until the broth is almost dry, and then add another ladle full and repeat. This process should take about 15-20 minutes. Don’t leave the risotto while it’s cooking, the quinoa on the bottom of the pan burns easily. If you run out of broth, just use hot water the same way you would broth. If you have made risotto before, just know that the quinoa version will require less broth and cook a bit quicker.
Once your risotto is cooked through (taste it to verify that the quinoa is cooked), turn heat to low and add the cheese, cream and salt and pepper to taste. Risotto should be soft and wet, not dry like typical quinoa. It should be firm enough to be served as a side on a plate, but soft enough to giggle when the plate is shaken. Stir in the mushrooms just before serving.
This recipe is courtesy The Shiksa in the Kitchen

Z’roa

Z'roa Cocktail

Z’roa symbolizes the traditional Passover sacrifice, a lamb that was offered in the Temple in Jerusalem and then eaten as part of the seder meal. On the modern seder plate, z’roa is represented by a roasted lamb shank bone.

Developing a z’roa cocktail was one of the biggest challenges in creating The Sipping Seder. Rather than focus on the symbolic bone, we turned our thoughts to the origin of the custom. We crafted a deep, crimson cocktail to remind us of the blood of the sacrificial lamb.

Ingredients:

2 oz (60 ml) Basil Hayden’s Bourbon

2 oz (60 ml) Ruby Port

1 tsp (5 ml) Gum Syrup

¼ oz (7 ml) Lemon Juice

¼ tsp (1.25 ml) Maraschino Liqueur


Directions:

1) Combine all ingredients in a mixing glass. Shake well with ice.

2) Strain through a fine mesh strainer into a chilled cocktail glass.


Note:

Content courtesy: The Sipping Seder

Passover Chicken Schnitzel

Servings: 4 servings
Kosher Key: Kosher for Passover
Prep Time: 10 Minutes
Cook Time: 15 Minutes
Total Time: 25 Minutes

Ingredients

  • 2 lbs boneless skinless chicken breasts (4 large breasts)
  • 1 cup matzo cake meal
  • 2 eggs
  • 1 cup matzo meal
  • 1 tbsp paprika
  • Salt and pepper
  • Oil for frying (pick one with a high smoke point like grapeseed)
  • Fresh lemon wedges for garnish

You will also need

Plastic wrap, mallet, skillet, paper towels
Lay down a 2-foot long strip of plastic wrap on your kitchen countertop. Place chicken breasts on the plastic, leaving a 2-inch space between each breast. Cover the breasts with another strip of plastic, so the meat is sandwiched between two layers of plastic. Use a mallet to pound the breasts until they are a little less than ¼ inch thick. Season breasts with salt and pepper.
Set up three wide, shallow bowls and a large plate on your countertop. In your first bowl, place the matzo cake meal. In your second bowl, beat the eggs. In your third bowl, stir together the matzo meal, paprika, and 1 tsp salt till well blended. Leave an empty plate nearby where you will place your coated schnitzels.
Pour oil into a skillet until it’s deep enough for frying (about ½ inch). Heat the oil slowly over medium. While oil is heating, dip each breast one by one into your breading bowls—first coat with matzo cake meal, then with egg, then with the matzo meal mixture.
The ideal temperature to fry schnitzel is around 375 degrees F. When the oil is hot (but not smoking or splattering), fry the coated breasts in single-layer batches until they are golden brown on both sides. If your oil is at the right temperature, it should take about 3-4 minutes per side. Don’t fry more than two breasts at a time in a regular sized skillet, or the oil temperature will drop and the schnitzels will become greasy.
After frying, set the schnitzels on a paper towel and pat them dry to soak off excess oil. Sprinkle the schnitzels with salt to taste. Serve hot garnished with lemon wedges and your favorite condiment.
This recipe is courtesy The Shiksa in the Kitchen
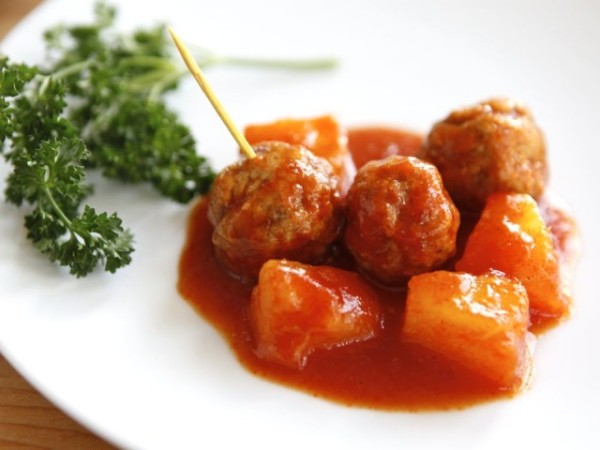
Passover Sweet and Sour Meatballs

Servings: 12-14 appetizer servings
Kosher Key: Meat
Prep Time: 15 Minutes
Cook Time: 45 Minutes
Total Time: 1 Hour

Ingredients

  • 2 large cans (20 oz. each) pineapple chunks in their own juice (no sugar added)
  • 3/4 cup tomato sauce
  • 3/4 cup ketchup
  • 1/2 cup cider vinegar (or sub white vinegar)
  • 1/4 cup brown sugar (or sub white sugar)
  • 2 tbsp tomato paste
  • 1 tbsp onion powder
  • 3/4 tsp salt, divided
  • 3/4 tsp garlic powder, divided
  • 3/4 lb. lean ground beef
  • 3/4 lb. dark meat ground chicken
  • 1 egg, beaten
  • 3-4 tbsp matzo meal
  • 1 tsp paprika
  • 1/4 tsp black pepper
  • Pinch of cayenne (or more to taste– add carefully, it’s very spicy!)
Note: I live in an area with a lot of great kosher markets, so I’ve never had trouble finding any of the items in this recipe with kosher for Passover certification. However, I’m told that in some places brown sugar and cider vinegar can be tough to track down with a KFP hechsher. If that is true in your area, feel free to swap cider vinegar for white vinegar, and brown sugar for white sugar.
Drain your two cans of pineapple chunks and reserve the juice.
In a medium pot, mix together tomato sauce, ketchup, cider vinegar, brown sugar, tomato paste, onion powder, 1/2 tsp salt, 1/4 tsp garlic powder, and the juice from the pineapple cans. Stir together and turn meat to low to let the sauce slowly warm.
Meanwhile, in a mixing bowl use a fork to mix together the ground beef and chicken, egg, 3 tbsp matzo meal, paprika, 1/4 tsp salt, 1/2 tsp garlic powder, paprika, black pepper, and cayenne. I like a little heat in the meatballs, so I add a heaping 1/4 tsp of cayenne. If you don’t want them spicy, you can omit it completely– or just add a pinch for depth of flavor.
Form the meat mixture into small 1-inch meatballs. If the mixture seems to moist or stick, add another tablespoon of matzo meal to the mixture. Place the meatballs into the warming sauce.
When all the meatballs are formed, bring the mixture to a boil and stir to cover the meatballs with sauce. Lower the heat to a low, even simmer and cover the pot.
Let the meatballs cook for 40 minutes, stirring frequently, till sauce thickens and meatballs cook all the way through. If the sauce seems to be reducing too fast or losing too much liquid, lower the heat and add a little water to thin it.
After 40 minutes, add the pineapple chunks to the sauce and stir to coat. Let the chunks warm in the sauce for 5 minutes.
Serve. You can serve this as an entree with a Passover-friendly starch, as a side dish, or with toothpicks as an appetizer. Enjoy!
This recipe is from The Shiksa in the Kitchen

Sephardic Charoset Truffles

Servings: About 25 truffles
Kosher Key: Pareve, Kosher for Passover
Total Time: 20 Minutes

Ingredients

  • 1 1/2 cups pitted dates
  • 1 1/2 cups dried apricots
  • 1/2 cup golden raisins
  • 3/4 cup shelled pistachios
  • 2 tbsp honey
  • 1/4 cup sugar
  • 1 tsp cinnamon

Place dates, apricots, raisins, pistachios and honey and place in a food processor.

Pulse for about 2 minutes until the mixture is smooth but still has texture. You may need to break up the sticky mixture a few times if it collects in a ball in the processor.

In a bowl, mix together the sugar and the cinnamon. Form date mixture into balls that are about ¾ inch in diameter. The balls will be sticky and soft. It will be easier to shape them if you wet your hands slightly.
Dry your hands. Dip the balls in the cinnamon sugar and coat thoroughly, and re-roll between your palms to smooth out any rough edges. Serve at room temperature.
This recipe is from The Shiksa in the Kitchen